The other day, I made a suggestion to one of my research students of an experiment to try. When I checked back a day later, she told me it hadn’t worked, and I immediately realized that what I had told her to do was very stupid. As penance, then, I’ll explain the underlying physics, which coincidentally has a nice summer-y sort of application alluded to in the post title.
If you’re the sort of person who enjoys swimming, and can either open your eyes underwater or regularly wear a mask or goggles, you’ve probably notice that the underside of the surface of a swimming pool or other body of water, looks shiny. If you’re in a place with cool marine life, you can even get awesome pictures like this:

(from this photography guide site which includes some other awesome examples). So, why do you get this effect?
The key physics here is the idea of refraction, which has to do with the propagation of light through matter. You can talk about this in a particle-like picture, if you want, but it’s usually described in terms of waves: light waves entering a material slow down slightly due to their interaction with the material, and as a result, their wavelength gets slightly shorter (you can think of it, loosely, as a given wave “catching up” to the wave in front of it as they hit the boundary). A light wave passing from vacuum into glass sees a reduction in speed to about 2/3rds of the speed of light in vacuum, and the wavelength gets shorter by a corresponding amount– orangey-red light at 600nm would have a wavelength of around 400nm, like that of violet light in vacuum. This is quantified by a number called the “index of refraction,” which is a number greater than 1 for ordinary materials; around 1.5 in the case of glass, about 1.3 in the case of water.
That’s all that happens if the light hits the surface head-on, but if it strikes at an angle, there’s more to it: the light bends as it enters the medium. This produces some cool optical effects, like this photo I took yesterday of a pencil in a thematically appropriate water bottle:

When you look at the picture, there seems to be a discontinuity in the pencil right at the surface of the water. That’s because the light rays from the pencil follow a slightly different path through the water than through the air, due to refraction. The physics of this is governed by an equation called “Snells Law” after some historical dude who apparently also invented the jagged little thing on fish hooks. Or something. You might want to check Wikipedia.
Snell’s Law has a very simple mathematical form that I will crib from Hyperphysics, which also has a little calculator on that page if you want to play with it:

The cartoon on the right in that figure shows what happens to a light ray moving from left to right as it enters a material at an angle. If you look at the angle between the light ray and a line perpendicular to the surface, you see that it gets smaller as you cross the boundary; you can determine exactly how much smaller from the formula on the left of that picture. This bending is useful for all kinds of things, chiefly the making of things like lenses for telescopes of vision correction– were it not for Snell’s Law, I wouldn’t be able to write this, because when I don’t have my contact lenses in, anything more than about six inches from my face is too blurry to read.
What’s a little harder to see because I cropped the picture a bit is that the opposite happens on the far side of the medium. You can get the idea by just reversing the direction at the first boundary, though: the ray comes in, and as it crosses from, say, glass to air, the angle gets bigger rather than smaller. Again, you can find the exact angles from the formula.
Now, if you think carefully about this, you can see that something weird will happen at some point. For a given combination of materials, as you go from the slow medium to the fast medium, there will be some incoming angle smaller than 90 degrees for which the outgoing angle is exactly 90 degrees– that is, it goes right along the surface, rather than passing through into the air. This is called the “critical angle” for the material. Beyond that angle, you get a phenomenon called “total internal reflection”– light striking the surface will bounce off, rather than pass through. There’s another nice figure from hyperphysics showing all of this in a kind of busy manner:

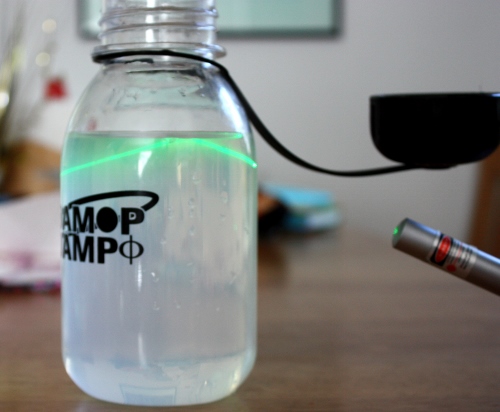
But there’s not really a need to rely on cartoons and equations for this: it’s easy enough to get a picture of, provided you have a camera on a tripod and a laser pointer. Here’s an example of total internal reflection at the side of the water bottle:

(I added a drop of milk to the water to make the laser show up more clearly, thanks to Rayleigh scattering.) You can see that the laser follows a straight line through the water, but when it hits the edge of the bottle, it doesn’t go through, but bounces off. This also happens at the boundary between water and air, as seen in the featured image up top, which I’ll reproduce here to save you scrolling:

(This should also serve as some reassurance that I didn’t secretly put a mirror surface on the side of the bottle to fake the previous picture…) Beyond a certain critical angle, all of the light reflects off the boundary, like a perfect mirror.
This is the physics behind the “shininess” of the bottom of the water surface in your pool, and awesome pictures like that turtle up above. Light from the sun passes through the water from the air side, and reflects off underwater objects. Some of the light rays headed back out of the water, though, will hit the surface at an angle greater than the critical angle, and undergo total internal reflection, making the water surface act like a perfect mirror and producing clear images for a smooth surface, or a general silvery smear if there are a lot of waves. Because of this, even water that’s very clear when looked at from above is hard to see out of, to the great relief of sport fishermen everywhere.
————-
So, what was the stupid advice for which I am atoning? Well, the student in question is looking at Rayleigh scattering of light passing through water with small particles in it (like the milk that makes the laser visible in the pictures above). This should lead to some attenuation of the beam as it passes through a long column of water, as light gets scattered out to the side; we’re trying to measure this, with an eye toward making a cool upper-level lab out of it.
To this end, we have a long, narrow water tank that we’re shining laser pointers through. We had a question, though, about the absorption of the beam, and it would be nice to have a measurement of the attenuation of the beam through different lengths of water. With a single tank, though, we can’t really get that, but I had an allegedly brilliant idea: if we sent light through the tank at different angles, it would cross different thicknesses of water, giving us the data we wanted without needing to scrounge up a bunch of containers of various lengths.
While it’s true that this does give different lengths, of course, this was a very dumb idea on my part because of total internal reflection. Beyond a small range of angles, the light reaching the end of the tank just reflects, and as a result, there’s nothing to detect at the other side. So we can’t actually get the relevant data by that method, which was a waste of my student’s time that I should’ve known about had I remembered my freshman year physics classes. Thus, this post.
(To get the relevant data, I went to Bed, Bath, and Beyond and bought a $20 set of rectangular glass storage containers; combining them in different ways should give enough different lengths to get a sanity check measurement of the attenuation…)
Fun post – very clear, despite the raleigh scattering ( I know, bad pun).
With respect to your narrow tank of water, I would have dropped a 45 degree mirror in to change the length of the beam by deflecting it out the side.
The narrow tank is actually too narrow to fit a standard optics mount inside– we’re trying to minimize the amount of water we need, and also secondary scattering on the way out.
I’ve learned to avoid mentioning typos in blogs, because most writers don’t tend to have the time to go back and fix them.
But things like lenses for telescopes of vision correction seems just potentially confusing enough to be worthy of correction.
If the student is using small particles like milk, the student is studying Mie scattering, not Rayleigh scattering. At least get the physics right!
There is another issue with changing the incident angle: the fraction of light that is reflected from the container surfaces will change. Can you measure the attenuation by the walls of the empty tank?
Finally, there must be good data on the frequency dependence of light absorption by water. It matters a lot to all sorts of people, from the Navy to biological oceanographers.
I’m never certain where the crossover between Rayleigh and Mie scattering is. We plan to try smaller particles (silica nanospheres), but milk is around three orders of magnitude cheaper.
The changing reflectivity of the surfaces, I had thought of, weirdly. The plan was to take a difference between empty containers and containers with water in. And the goal is not just to get a number, but to have a way of making the measurement in the lab– I could look up better values for basically everything we measure in our upper-level labs, but the important thing is to make the measurement locally. That way, students can Google an “accepted value” to plug into the percent error formula…
(Also, the plan was not to do this with just water, but with water plus scattering particles, for which there won’t be an accepted value. I was just typing in a hurry and didn’t include that…)
Wouldn’t lowering a mirror into the tank and reflecting the beam out at a steeper incident angle work?
I love the idea for this lab, particularly as it can be left as an open-ended investigation where you don’t give them a procedure to follow! In this case, there could also be a theoretical option to explore the models used to predict the results.
Rayleigh is a much-smaller-than-the-wavelength approximation to the full result given by the Mie calculation. Scattering from water droplets or a milk suspension is definitely Mie, while air molecules are definitely Rayleigh. What I don’t know is how large the error is as a function of size/wavelength, which is what matters to you. I knew a guy who did the model calculation when teaching grad E+M, but have no memory of what his graphs looked like other than that Mie scattering has lots of “interesting” features that start to resemble what you see in nuclear or particle physics scattering theory.
Maybe what matters is whether you can afford a variety of “dust” sizes that go down into the 1 to 10 nm range and can also explore a range of concentrations. If not, milk is great because it seems to have some of the same features as air pollution. I always get a brownish “sunset” when doing it as a demonstration, so it still has some wavelength dependence at the size of homogenized fat globules.